# Linux OS
# Booting
## {{@273#bkmrk-tiger-city-imx-embed}}
- [{{@143#bkmrk-emmc}}](https://doc.redisage.com/link/143#bkmrk-emmc)
- [{{@143#bkmrk-sd-card}}](https://doc.redisage.com/link/143#bkmrk-sd-card)
- [{{@143#bkmrk-booting-after-the-po}}](https://doc.redisage.com/link/143#bkmrk-booting-after-the-po)
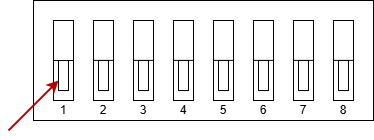
### eMMC
#### DIP switches positions
To boot from the eMMC the DIP switch No. 1 needs to be in the position shown in the picture below.
#### Power supply
Connect a power supply to the pins shown in the picture below. The suggested power supply is a DC voltage in the range of 12-24 V.
{{@274#bkmrk--2}}
#### First boot
The connected power supply should initiate the first boot.
#### Console
Booting logs are displayed in the console, indicating a proper boot from the eMMC, as shown in the picture below.
[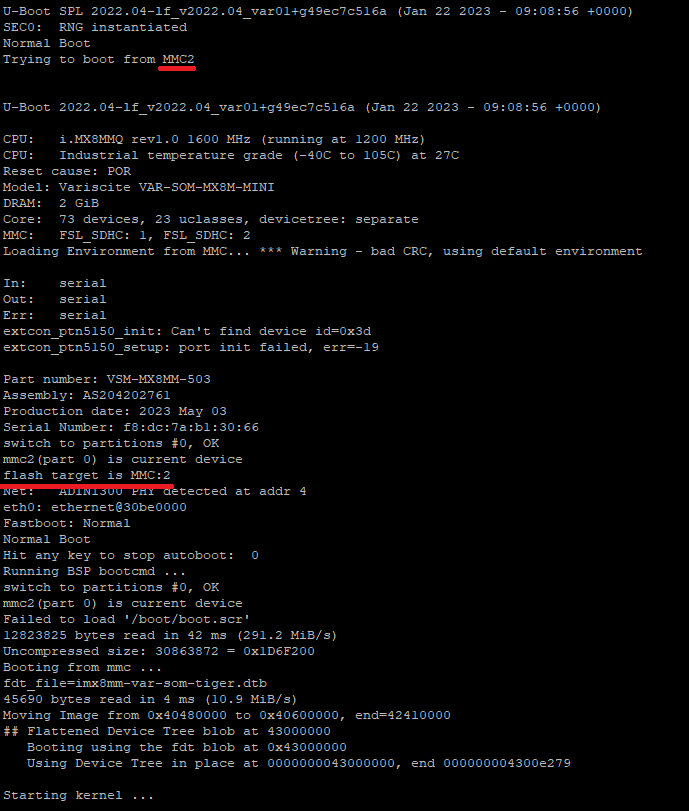](https://doc.redisage.com/uploads/images/gallery/2024-04/7e5e81cf-604f-4a14-853d-2bd09f1da13a.png)
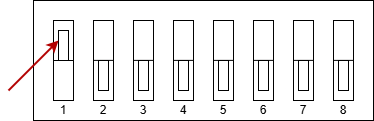
### SD card
#### DIP switches positions
To boot from the SD card the DIP switch No. 1 needs to be in the position shown in the picture below.
#### Power supply
Connect a power supply to the pins shown in the picture below. The suggested power supply is a DC voltage in the range of 12-24 V.
{{@274#bkmrk--2}}
#### First boot
The connected power supply should initiate the first boot.
#### Console
Booting logs are displayed in the console.
### Booting after the power-off command
If the device is turned off by inputting the power-off command in the terminal, the previous boot methods have to be initiated via the reset button placed on the front panel. Its placement is shown in the picture below.
[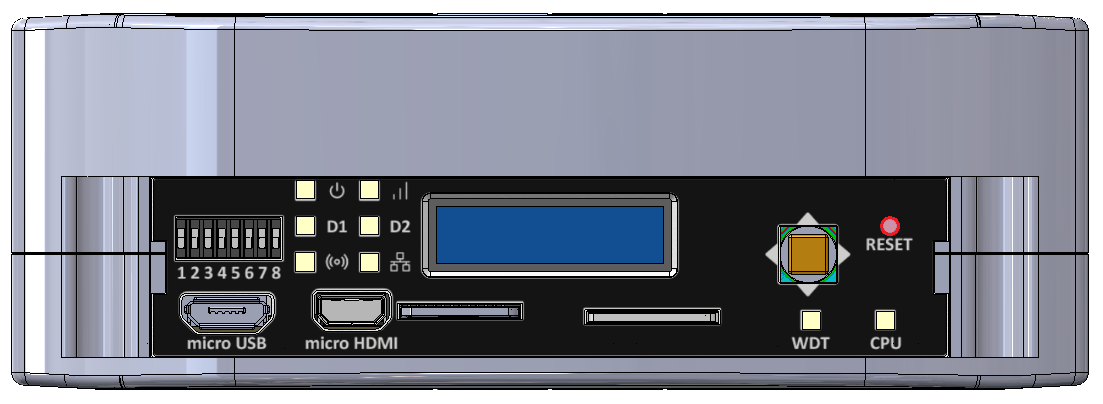](https://doc.redisage.com/uploads/images/gallery/2026-03/JpQimage.png)
# New Page
# New Page
# New Page
# System Console
## {{@273#bkmrk-tiger-city-imx-embed}}
### UART console
#### Connecting the adapter to the device
To display the console via UART an RS232 → USB adapter needs to be connected to the pins of the connector shown on the picture below.
[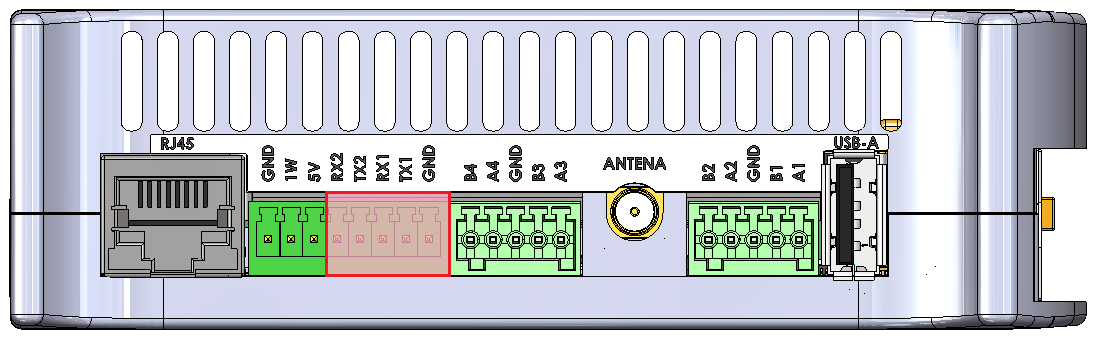](https://doc.redisage.com/uploads/images/gallery/2026-03/s3Oimage.png)
#### Configuring COM port
A serial port terminal needs to be configured with following configuration:
| Bits per second
| 115200 |
| Data bits | 8 |
| Parity | None |
| Stop bits | 1 |
Then, booting from the chosen source should be realized according to the [instruction](https://doc.redisage.com/link/143#bkmrk-page-title).
### SSH console
#### Finding an IP of the device
The device's IP can be obtained via 2 methods:
- connecting to the UART console and inputting the “ip a” command when logged as root or other user
- using the joystick shown in the picture below the IP can be displayed on the front panel display
[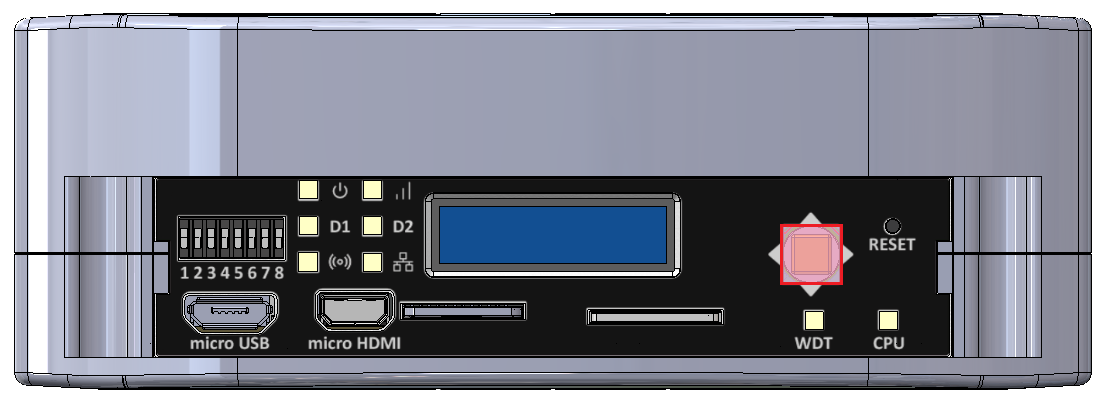](https://doc.redisage.com/uploads/images/gallery/2026-03/2XQimage.png)
#### Configuring COM port
The SSH terminal needs to be configured with the IP of the device. Then, booting from the chosen source should be realized according to the [instruction](https://doc.redisage.com/link/143#bkmrk-page-title).
# User Management
## {{@273#bkmrk-tiger-city-imx-embed}}
### Default user
The default user in Tiger is the only one available after the first boot.
- login: **root**
- no password
### Create new users
In order to list all existing users in the system use the following command:
```bash
awk -F':' '{print $1}' /etc/passwd
```
To add a new user and create a home directory for it use the following command:
```bash
sudo useradd -m user_name
```
To verify that the user was created and view the user’s details use:
```bash
sudo id user_name
```
To set a new password for the user use the following command:
```bash
sudo passwd user_name
```
After that, logging in as a new user will be possible. The current user can be checked with the "whoami" command.
### Delete users
A user and its home directory can be deleted with the following command:
```bash
sudo userdel -r user_name
```
# Updating
## {{@273#bkmrk-tiger-city-imx-embed}}
### System Image
A system image (`.swu` file) is required for the update. The image is protected by the image checksum and by the image signature. That means a modified image will not be accepted by the device. Only images from our source allow for updates. It is possible to transition from older images to newer ones and vice-versa.
There are several ways to update Tiger:
- through the Tiger console using a file on internal or external storage (eMMC or USB drive),
- through the Tiger console using a file from an external server (FTP or HTTPS),
- via the built-in update server.
The first two options require access to the console (username and password). The third option does not require a password for the device.
### Storage (eMMC or USB drive)
1. Login to the device console
2. Insert external storage or copy the file to Tiger's storage.
3. In the console, type `swupdate -i -k /etc/default/rsakey.pub`.
4. The update will proceed automatically.
### External Server (FTP or HTTPS)
1. Login to the device console
2. For an FTP server, type `swupdate -d -u ftp:// -a :`.
3. For an HTTPS server, type `swupdate -d -u https:// -k /etc/default/rsakey.pub`.
4. The update will proceed automatically.
### Built-in Update Server
1. Connect the device to the network.
2. Launch a browser on a PC.
3. In the browser, enter `http://:8080`.
4. Select the `.swu` file from the PC storage and confirm the selection.
5. The update will proceed automatically.
Warning! Update files are the default version of firmware. All updates factory reset the device. Make sure you backup all of your important files.
# System Overview
## {{@273#bkmrk-tiger-city-imx-embed}}
### Distribution
Custom Linux distribution based on the Yocto Project. Type `uname -a` to check installed version, kernel, etc.
### Supported languages
- English (US)
- English (GB)
### User utilities
#### Text editor
The default available built-in text editor on the device is `vim`.
#### Wi-Fi
The device is equipped with a Wi-Fi module and a NetworkManager library, which allows it to connect to nearby wireless networks.
##### How to enable and connect with WLAN:
1. Check the library status: `systemctl status NetworkManager`
2. If NetworkManager is disabled, type `systemctl start NetworkManager`
3. It is possible to enable it always with autostart: `systemctl enable NetworkManager`
4. Search available networks: `nmcli dev wifi list`
5. Connect with your chosen network: `nmcli dev wifi connect password `
6. Check your connection status with `nmcli connection show --active` or `ifconfig`
### System libraries
List of some commonly used available packages:
- Network Manager
- Modem Manager
- Chromium
- Gawk
- OpenCL
- Bzip2
- C++
- Python 3
- SQLite3
- OpenSSL
- Perl 5
- Curl
- Git
- Debuginfo
- glib
- i2c-tools
- GPIO mockup
- gthread
- iperf
- microhttpd
- rpmbuild
- SSL
- swupdate
- Wayland
- Weston
- XCB
- rpm-plugins
- sudo
- xtables
And much more. All the preinstalled system libraries can be found in `/usr/lib `directory.
User can install any other necessary libraries.
### Drivers
System drivers can be displayed using `lsmod` command.
# Restoring Factory Settings
## {{@273#bkmrk-tiger-city-imx-embed}}
#####
##### To factory reset the device, you need to reinstall the current system version or perform an update. The entire process is detailed in the [Updating](https://doc.redisage.com/books/tiger-city-imx/page/updating) section.
# Building Custom System Image
## {{@273#bkmrk-tiger-city-imx-embed}}
#####
##### If you would like to ask a specific question, please visit our [Contact Us](https://doc.redisage.com/books/tiger-city-imx/page/contact-us) page for any further information.