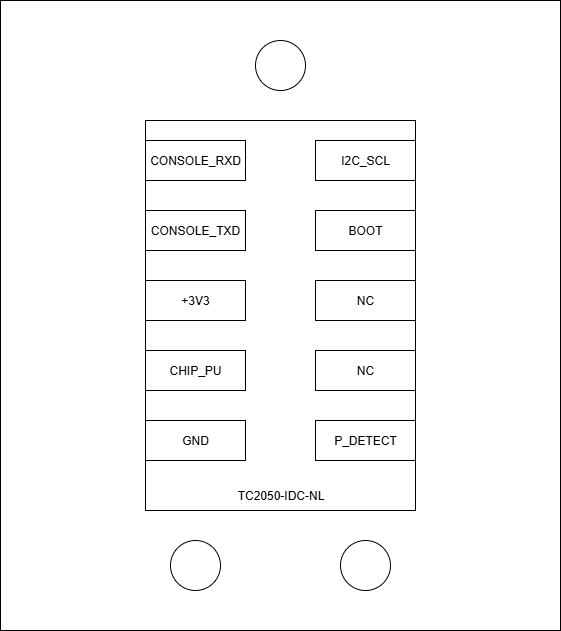
# Programming ## {{@218#bkmrk-open-iot-and-iiot-ga}} ### Install IDE Please, follow the instructions located [here](https://docs.espressif.com/projects/esp-idf/en/latest/esp32/get-started/index.html) to install the ESP-IDF framework on your local machine. ESP-IDF is available both on [Windows](https://docs.espressif.com/projects/esp-idf/en/latest/esp32/get-started/windows-setup.html) and [Linux](https://docs.espressif.com/projects/esp-idf/en/latest/esp32/get-started/linux-macos-setup.html). It can also be installed through some popular IDEs: [VS Code](https://github.com/espressif/vscode-esp-idf-extension/blob/master/docs/tutorial/install.md) or [Eclipse](https://github.com/espressif/idf-eclipse-plugin/blob/master/README.md). ESP-IDF is required to build the examples written in C for the device. However, it can be also programmed in [MicroPython](https://docs.micropython.org/en/latest/esp32/tutorial/intro.html) ([Thonny](https://thonny.org/)). ### Connect the programmer ESP32 IoT and IIoT Gateways can be programmed only with the external hardware programmer (for example [**P03**](https://doc.redisage.com/link/219#bkmrk-page-title)) connected via the Tag-Connect connector. After connecting it to the board and a PC, a new COM port should be available.
[![image-4.webp](https://doc.redisage.com/uploads/images/gallery/2024-06/scaled-1680-/image-4.webp)](https://doc.redisage.com/uploads/images/gallery/2024-06/image-4.webp)[![image-6.webp](https://doc.redisage.com/uploads/images/gallery/2024-06/scaled-1680-/image-6.webp)](https://doc.redisage.com/uploads/images/gallery/2024-06/image-6.webp)
### Connect the power supply In order to successfully flash the device, it has to be connected to the power supply (9 - 30 VDC) using the VCC and GND connectors. [![image.png](https://doc.redisage.com/uploads/images/gallery/2024-06/scaled-1680-/EkQimage.png)](https://doc.redisage.com/uploads/images/gallery/2024-06/EkQimage.png) ### Create your own programs After all of the above steps are done, the device should be ready to be programmed. ### Build, flash and monitor the device #### VS Code ESP-IDF extension 1. Make sure that there is a ".vscode" folder in the project tree. If not, add it with the "F1" + "ESP-IDF: Add vscode Configuration Folder" command. [![image.png](https://doc.redisage.com/uploads/images/gallery/2024-06/scaled-1680-/Rpfimage.png)](https://doc.redisage.com/uploads/images/gallery/2024-06/Rpfimage.png) 2. Set your device target with "F1" + "ESP-IDF: Set Espressif Device Target". Then choose current workspace folder and then "esp32". Lastly choose "Custom board" and confirm it. [![image.png](https://doc.redisage.com/uploads/images/gallery/2024-06/scaled-1680-/GX6image.png)](https://doc.redisage.com/uploads/images/gallery/2024-06/GX6image.png) [![image.png](https://doc.redisage.com/uploads/images/gallery/2024-06/scaled-1680-/ucEimage.png)](https://doc.redisage.com/uploads/images/gallery/2024-06/ucEimage.png) [![image.png](https://doc.redisage.com/uploads/images/gallery/2024-06/scaled-1680-/RY3image.png)](https://doc.redisage.com/uploads/images/gallery/2024-06/RY3image.png) 3. Set port where the device is attached to with "F1" + "ESP-IDF: Select Port to Use (COM, tty, usbserial)". [![image.png](https://doc.redisage.com/uploads/images/gallery/2024-06/scaled-1680-/Qkkimage.png)](https://doc.redisage.com/uploads/images/gallery/2024-06/Qkkimage.png) 4. Finally select "UART" flash method with "F1" + "ESP-IDF: Select Flash Method". [![image.png](https://doc.redisage.com/uploads/images/gallery/2024-06/scaled-1680-/Aa9image.png)](https://doc.redisage.com/uploads/images/gallery/2024-06/Aa9image.png) [![image.png](https://doc.redisage.com/uploads/images/gallery/2024-06/scaled-1680-/3PAimage.png)](https://doc.redisage.com/uploads/images/gallery/2024-06/3PAimage.png) 5. Build your project, flash it to the device and open a serial monitor with the "F1" + "ESP-IDF: Build, Flash and Start a Monitor on your Device". If everything was set properly the serial monitor should open after a successful flash. [![image.png](https://doc.redisage.com/uploads/images/gallery/2024-06/scaled-1680-/PjNimage.png)](https://doc.redisage.com/uploads/images/gallery/2024-06/PjNimage.png) #### Thonny 1. Hit "F5" button in Thonny IDE to run the current script. [![image.png](https://doc.redisage.com/uploads/images/gallery/2024-06/scaled-1680-/Q0Kimage.png)](https://doc.redisage.com/uploads/images/gallery/2024-06/Q0Kimage.png) 2. Click "File" -> "Save copy..." -> "MicroPython device" and save this file as "main.py" in order to execute this code every time the gateway powers on. [![image.png](https://doc.redisage.com/uploads/images/gallery/2024-06/scaled-1680-/9OGimage.png)](https://doc.redisage.com/uploads/images/gallery/2024-06/9OGimage.png) [![image.png](https://doc.redisage.com/uploads/images/gallery/2024-06/scaled-1680-/y5yimage.png)](https://doc.redisage.com/uploads/images/gallery/2024-06/y5yimage.png) [![image.png](https://doc.redisage.com/uploads/images/gallery/2024-06/scaled-1680-/Wn4image.png)](https://doc.redisage.com/uploads/images/gallery/2024-06/Wn4image.png)